| Introduction Site Map Main Project Email: jja@nac.net |
— Stanislaw Lem, Solaris


Thursday, March 3rd, 2005
While I'm not moving as swiftly as I wanted on the Something Positive piece, I'm still making good progress. This time, I'm going to explain the steps I have taken and am taking to finish the piece, using Adobe Photoshop and Illustrator.
I started by scanning my pencil sketch into Photoshop and playing with the Levels and Contrast controls until the pencil lines were as dark as possible while leaving the background as white as possible. I then selected the white background in Photoshop and deleted it, leaving only the pencil marks and a bit of the gray white halo of shaded pixels against a transparent background. When I placed the document in Illustrator, the background remained transparent.
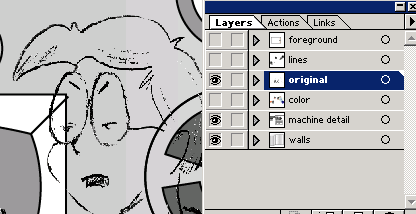
Above is part of a screen shot from Illustrator showing the Layers palette. Layers in Illustrator are analogous to stacked sheets of transparent material on which you can draw; this gives you great flexibility in organizing and controlling groups of objects. You can see above that I have named the layers according to what objects they're holding. The original layer holds the transparent photoshop documents. The eye symbol to the left of each name controls whether that layer is visible or hidden.
You can place a non-transparent image on the bottom layer of an Illustrator document and make it dim so that you can readily trace over it... but this method has the side effect of covering the bottom image with your drawing. If you're just drawing lines, you can get away with it, but flat areas of color can hide detail. For this reason, I put the lines on their own transparent layer, and created another layer below it. I locked the original layer so no changes can be made to it (note the lock symbol next to the layer name below). This lets me draw 'over' the lines, with the objects I draw actually appearing on the layer under the lines. Note that Davan's skin color is appearing over the background, but is still given edge definition by the pencil lines on top.
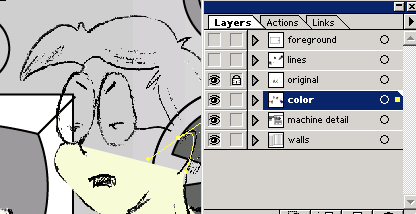
The drawing tool I'm using creates Bézier curves to define shapes. I have not studied the mathematical basis of the curves; I just know how they function within Illustrator. I won't go into how the lines are drawn at this point. I'll just note that I can use the tool to enclose an area and apply a fill color to that area. I select the color (in the above case, Davan's skin color) by flipping back to Photoshop and using the eyedropper tool to get the RGB color value, which I then plug into Illustrator.
It's getting late again, so I'll continue this in the next entry. Until!
pageatatime.com is hosted by net access corporation - www.nac.net